
Orca Slicer V2.3.1 Beta Download For Latest 3D Printing Slicer
Get Next-Gen Slicing Software for Precision 3D Prints
Download Orca Slicer, a free and open-source 3D printing software with smart calibration, multi-printer support, and tools for precise, high-quality prints.
What is Orca Slicer?
Orca Slicer is the Next-Gen Slicer Program with clean interface and ultra-fast slicing. It’s based on PrusaSlicer & Bambu Studio and has all the powerful features it takes to be an awesome 3D Printing Slicer. It has Smart Slicing & Print Settings, Multi-Material & Multi Color Support, and it works great with Bambu Lab AMS. Also, it has built-in Calibration tools and advanced Support Generation. It has a powerful preview & analysis program which supports layer-by-layer G-Code preview.
People love Orca Slicer because of its clean UI than most of other Slicer Programs. It supports tons of 3D file formats and can easily turn them into G-Code. The performance is also great as it has a fast slicing engine and auto update program. You can also follow the GitHub community for new features releases, and all this for free.
Key Features of Orca Slicer
Orca Slicer is a Slicer program which can turn 3D models into G-Code. It’s a popular open-source 3D printing slicer. It supports various 3D models files types such as .STL, .OBJ, .3MF, .AMF, .PRUSASL1 / .BAMBU / .GCODE, etc. These 3D objects files can be opened with Orca Slicer and can be used to convert them into G-Code. The best thing is Orca Slicer is completely free and supports various platforms such as Windows, macOS, and Linux.
Simple Interface
Orca Slicer is an open source & community based Slicer program which is a fork of Bambu Studio which itself is a fork of PrusaSlicer. Hence, Orca Slicer is also a fork of PrusaSlicer. It has known UI as of PrusaSlicer, making it a simple, and easy-to-understand interface. All the features are easy to understand as well, to beginners as well as professionals in 3D Printing.
Auto-calibration
Orca Slicer has some of the very best collection of one-click calibration tests which are required to generate the G-code. These tools help the slicer program to perform with a better performance. It has Temperature Tower, Flow Rate, Pressure Advance, and Vertical Fine Artifact Calibration Tests. The Temperature Tower prints a tower at different temperatures for all the sections. So, you can choose which is the best temperature for layer bridging or adhesion, and filament. The Flow Rate helps you to check the correct Flow Ratio or Extrusion Multiplier which helps the Printer to prevent over or under extrusion.
The Pressure Advance as known as PA Calibration Test offers two methods Line and Tower which helps you to calibrate Klipper’s Pressure advance feature. It is very crucial for sharp corners. The Retraction Test helps you to locate the perfect retraction distance as well as speed to eliminate stringing. The last Calibration Test is VFA. Vertical Fine Artifact Test will help you to identify and tune out the subtle vertical patterns on the prints which are certainly caused by Stepper Motor Vibrations. It makes the complex process of tuning a 3D printer into an easy work.
Default profiles for popular Printers
Orca Slicer has over 300+ printers support, from custom to company printers. Also, it has default profiles for so many popular prints such as Generic Kipper Printer, Generic Marlin Printer, Generic RRF Printer, and Generic ToolChanger Printer. Apart from these custom made printers, lots of popular companies printers also has default profile support including Anker M5, Anycubic i3 Mega S, Anycubic Chiron, Anycubic Vyper, Anycubic Kobra, Anycubic Kobra Max, Anycubic Kobra Plus, Anycubic 4Max Pro, Anycubic 4Max Pro 2, Anycubic Kobra 2, Anycubic Kobra 2 Plus, Anycubic Kobra 2 Max, Anycubic Kobra 2 Pro, Anycubic Kobra 2 Neo, Anycubic Kobra 3, Anycubic Kobra S1, Artillery Sidewinder X1, Artillery Genius, Artillery Ginius Pro, Artillery Sidewinder X2, Artillery Hornet, Artillery Sidewinder X3 Pro, Artillery Sidewinder X3 Plus, Artillery Sidewinder X4 Pro, Artillery Sidewinder X4 Plus, Bambu Lab X1 Carbon, Bambu Lab X1, Bambu Lab X1E, Bambu Lab P1P, Bambu Lab P1S, Bambu Lab A1 mini, Bambu Lab A1, BIQU B1, BIQU BX, BIQU Hurakan, Blocks Pro S100, Blocks RD50 V2, Blocks RF50, Chuanying X1, Co Print ChromaSet, Comgrow T300, Comgrow T500, and many more.
With Orca Slicer, you can easily control how the perimeters such as Walls and Z-seam are printed. You can try Wall Control and Seam Control.
Precise Wall and Seam Control
Wall Control lets you use Wall Generator, Wall Order, and use precise Settings. When you use Wall Generator, you can choose between the Arachne engine or Classic engine to choose variable width or constant width. With Wall Order, you can easily specify the printing order in which print is supposed to happen, you can choose inner or outer walls first, according to your project. There is a fact that printing outer walls first can improve dimensional accuracy while printing inner walls will improve overhangs. With these precise settings, you can control Wipe on loops to clean the nozzle before it travels as well.
Sandwich mode
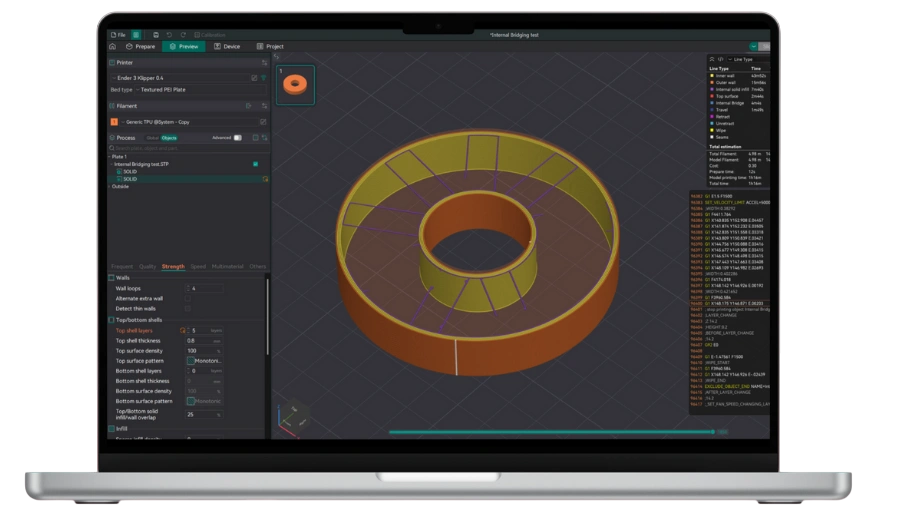
With Seam Control lets you can try to hide Z-seam as well. Z-seam is an unavoidable mess which nobody wants in their projects. They are small & vertical line or series of bumps on the surface of a 3D printed object that marks where the print head starts and stops extruding material for each new layer of the print. You can use Orca Slicer to hide them. You can use Seam Position to control where the seam is placed. You can choose between the nearest, aligned, back, and random. However, choosing Aligned is best for hiding Z-seam in any sharp corner. You can use Scarf Seam Advanced Technique to create less noticeable seam compared to any old traditional method. With this technique, you can also control the angle & length of scarf joint. If you want your prints to look great, you need to properly manage walls and seams. And these techniques can really help.
Polyholes Support
in CAD models, 3D Printers suffers creating smooth & continuous curves but with Polyholes, this problem can be solved easily. Orca Slicer supports Polyholes. It convert perfect circles into polygons which usually improves the dimensional accuracy of printed holes. You can enable it from the Quality Settings “Convert holes to polyholes”.
Wider Compatibility
Orca Slicer supports tons of printers as well as custom printers. Custom Printers including Kipper, Marlin, RRF, and ToolChanger are supported. Also, various companies printers such as Anker, Anycubic, Artillery, Bambu Lab, BIQU, Blocks, Chuanying, Co Print, Comgrow, Construct3D, Creality, DeltaMaker, Dremel, Elegoo, Eryone, Flashforge, FLSun, FlyingBear, Geetech, Kingroon, MagicMaker, Prusa, Qidi, Ratrig, Snapmaker, Sovol, Volumic, Voron, and so many other brands printers are supported.
Integration with Klipper & Obico
Klipper Integration: With Orca Slicer, you can use direct network connections to add your printer with your IP Address. As you have connected via a wireless connection, you can upload G-code files directly to your printer and start printing with this software, without the need of a external storage device such as USB Drive or SD Card. From the Live Monitoring Tab, you will access a dashboard which can show extruder/bed temperature, G-code console, printing process, and many other features.
Obico (The Spaghetti Detective) Integration: With Obico, you can detect any failure in the printing process with the help of a webcam. Obico has this technique to process your print with a webcam and if it detects any failure, it pauses the printing process and notifies you. With OrcaSlicer, you can send print jobs directly to your Obico managed printers for remote control and monitoring. You can do it from anywhere. It’s great because you can manage all the printing process with one single software.
G-code Customization
If you are a professional and want to control every aspect of your machine which are not natively supported by your printer, then, try out the Orca Slicer’s custom G-Code customization feature. So for advanced users who need to control every aspect of the printing process, Orca Slicer provides hooks to inject custom G-code at various points in the print process. However, you need to have a deep knowledge to write your own custom G-codes, which can be pretty risky. It’s designed for designated sections in the printer, filament, and print profiles.
There are four main sections in this process:
Granular Control over Infill, Supports, and Temperature
Orca Slicer software offers deep customization for these three fundamental aspects of a print.
Infill
Patterns & Density: Orca Slicer offers a wide variety of patterns including Gyroid, Honeycomb, Cubic, and more. They comes with precise density control too.
Lightning Infill: It’s an intelligent infill type which only generates an internal structure where it’s need to support the Top Surfaces. It saves printing time & materials on models that don’t require any internal strength.
Gradual Infill: Throughout the model, the infill density will vary. It will use less at the bottom and more near the top. All this to save material and while providing strong support for top layers.
Supports
Type: Normal (Grid/Snug) or Tree (Organic). Organic supports are branch-like, use less material, and print faster. They are also easier to remove.
Paint-on Supports & Blockers: With OrcaSlicer, you can manually paint areas of your model where that require support, and areas where you want to prevent supports from being generated.
Detailed Parameters: You can fine-tune everything in Orca Slicer (Support Angle Threshold to Distance between support & model, to properties of support interface layers).
Temperature
With Orca Slicer, you can control the nozzle and bed temperature with high precision. You can select different temperature settings for the first layer for better adhesion while different for the rest.
Multi-Material Ready & Advanced Cooling Options
Orca Slicer can handle multiple filaments. We can assign different filaments to different parts of a model easily. When you switch a filament, the old color needs to be purged from the nozzle, then Orca Slicer generates a tower next to the print for purging the old color from the nozzle. This process is called Purge Tower & Wipe Tower.
Advance Purging is available to provide new smart options to reduce waste such as Flush to infill or Flush to object’s support. These are used where the purged material is used for the print’s own infill and supports, instead of acting as a separate tower. Advance Cooling is also available in Orca Slicer. Here, you can change the speed of the cooling fan, you can run it at the max speed to make sure printer stays cool when its overhangs or bridges.
Orca Slicer has an automatically “Control the Layer Time” feature to slow the prints down the small layers. It helps in cooling and providing a non-melty result to your prints.
Regular Updates with Nightly builds
Orca Slicer supports auto regular updates. Whenever you run it, it will search for any new update, even the alpha builds are available for usage. You can skip any version you don’t want to download or install. There is an option to “Check for stable build updates only”. You can tap on it to receive only tested & stable updates of Orca Slicer. In the auto update prompt, you can also check for release notes and changelog. You can opt-in with Nightly builds to get awesome updates regarding new features in development, upcoming features, and more.
Download Orca Slicer (Latest Version)
Download Orca Slicer Nightly Builds
If you are willing to use the newest features of Orca Slicer without waiting for so long, getting the Nightly must be a great option. You can opt-in for the alpha updates and test new features. Sometimes these feature never release in the stable updates due to few bugs. However, you can give it a try. Download for Windows, macOS, Linux today.
What’s New in The Latest Version?
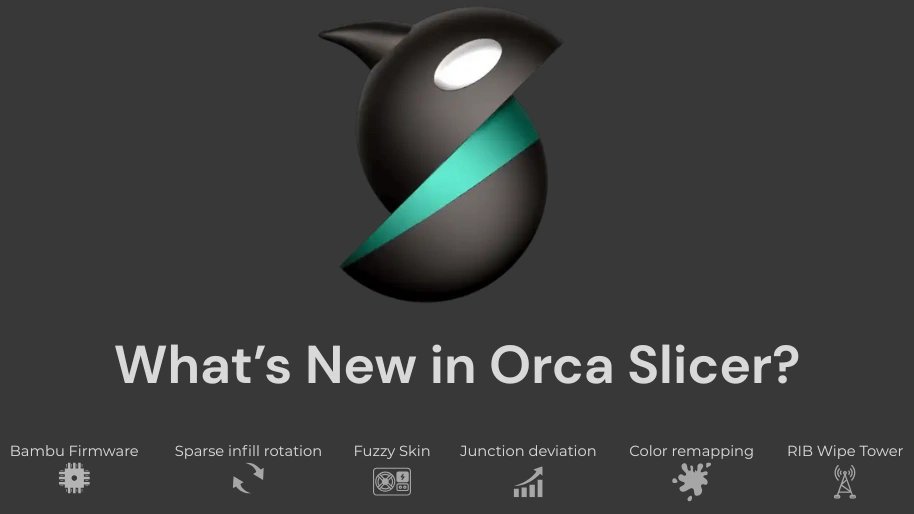
Orca Slicer is updated to 2.3.0.1 – alpha version as of September 2025. This update focuses on infill, surface control, motion tuning, and workflow polish. In this new update, the following is available:
Machine Start G-code: At the start of printing process, it’s used for homing (G28), bed meshing (BED_MESH_CALIBRATE), setting initial temperatures, and printing a prime line.
Infill Line Multiplier: Orca Slicer now lets you control over your print’s internal structure even more. It will help you multiply the number of infill lines while preserving your chosen infill density, hence it provides more flexibility to the program. It also helps balancing Orca Slicer’s strength and material distribution. You can create complex and customized internal structure as your printing needs in Orca Slicer by increasing rigidity and fine-tuning material usage.
Improved Flow Rate Calibration: Now you can use ipArchimedeanChords pattern for flow rate calibration. Thanks to Softfever and Noisyfox. The surface pattern & printing sequence in Orca Slicer’s Flow rate calibration test is redesigned and now gives better accuracy.
Comprehensive Input Shaping and Junction Deviation Calibration Tools
OrcaSlicer introduces these calibration tools to optimize motion control on Marlin 2 and Klipper-based printers with a 2-step calibration process. First, it identifies the optimal input shaping frequency and then it does fine-tuning damping ratios. So users can reduce ghosting or vibration artifacts. It also supports Marlin M593 G-code and initial Klipper compatibility, it provides granular control, a dedicated calibration UI, and works on wide range on machines such as Ender-3 class printers, and so many high-performance models such as Voron 2.4 and FLSun T1 Pro. With various techniques, Orca Slicer supports Advanced Motion tuning, supporting more printers, providing clean & high-quality prints.
Add Fuzzy Skin Painting: This feature is ported from PrusaSlicer by Noisyfox. With Orca Slicer, you can now paint the areas to apply the fuzzy skin. This new Paint-on fuzzy skin feature can help us brush texture directly onto chosen surface. It provides precise control over areas where randomized finish appears. This feature is great for adding grip, decoration, or selective surface details without customizing the whole print.
A New Seam Alignment Option: A new feature is added in this update of Orca Slicer which improves print aesthetics on front-facing models such as Sculptures. This new feature offers more balanced & visually looking great results.
Remap Filament for Pre-colored Models: An intuitive color remapping feature is available now which works great when printing pre-colored models. Now you can adjust filament assignment when a model’s built-in color sequence doesn’t match with their printer’s loaded filament order. It eliminates the need to physically rearrange filaments or modifying the model files. It’s great when you are working with a pre-painted model where the artist’s intended color order is different from your current extruder setup. Now, we can remap the assignment through the interface.
G-Code Legend Viewer Improvements: Now the G-Code legend offers more compact layout offering a clearer view for print preview.
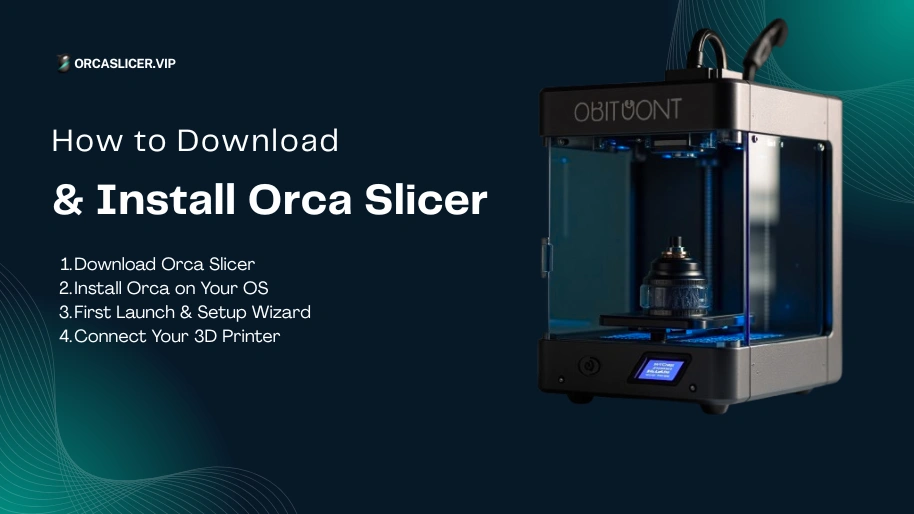
How to Download and Install Orca Slicer?
Here is the complete guide to download & install Orca Slicer on Windows. Even you can check the offcial how to build guide.
Step 1: Download Orca Slicer
Step 2: Install Orca on Your OS
Step 3: First Launch & Setup Wizard
Step 4: Connect Your 3D Printer
Orca Slicer Features in Detail
Advanced Algorithm for Faster Slicing
Older Slicer programs use a fixed line width for all parts of a model but Orca Slicer supports The Arachne engine developed by Ultimaker which allows variable-width extrusions. So, instead of trying to fit a constant width line into a thin wall, this engine can vary the extrusion width. For a thin wall, it lays down a single wider line instead of two very close lines that can overlap. For wider areas, this engine uses fatter lines to fill space more efficiently.
Because of Orca Slicer’s advanced algorithm in Arachne engine, it precisely reproduces fine details & thin walls. It creates strong & solid perimeters by removing gaps between walls. You can use both Arachne and Classic Wall Generators, giving you better control.
Pressure Advance Tools
The Pressure Advance Tools of Orca Slicer are a part of calibration suite. It’s a critical feature for all the users especially Kipper Printer users. PA is a Klipper Firmware feature that compensates for the pressure buildup inside the nozzle during extrusion. If you don’t have PA tools, the corners can be bulged and seams can have blobs. But if you properly tune it, it will clean seams even at high printing speed and you will get sharp corners. There are two Pressure Advance Tools offered by Orca Slicer: PA Line and PA Tower. We need the PA Tools to achieve the best & high Printing quality at a good speed. With Orca Slicer, it’s possible.
PA Line: It prints a single line which changed speed from slow to fast to slow. You can easily examine the line and fine the point where extrusion is most consistent to find the PA value. The PA Tower prints a tower with sharp corners, varying the PA value at the different heights. You can easily pick the sharpest corners with this.
Stealth Mode
Stealth Mode was originally available in Bambu Studio which was later inherited by Orca Slicer. It’s a print profile setting that reduces the printer’s stepper motors’ Noise and makes it silent. It works by decreasing the max acceleration and Jerk Values. Hence, the printer makes slow & smooth movements. It also reduces the high-frequency vibrations caused by motor. However, due to reduction in acceleration, the print speed in Stealth Mode will be longer and print time will be more as compared to normal mode. However, if you live in noise-sensitive environment, this method works like a charm.
Sandwich Mode Explained
An advanced wall printing method where the flat mechanical parts prints the outer walls first and later the inner walls. It creates a Sandwiched effect which is why it’s called Sandwich Mode. This mode helps in creating a Superior Surface Finish overall and also controls the flow of filament in the walls. You can enable Sandwich Mode in Orca Slicer with these steps:
How to Use Orca Slicer? [Beginner’s Guide]
Setting Up Your Printer Profile
Importing 3D Models
Slicing and Previewing
Sending G-code to Printer
Why Choose Orca Slicer Over Alternatives?
You can choose Orca Slicer over alternatives such as PrusaSlicer, Cura Slicer, Bambu Studio, MatterControl, and Lychee Slicer because Orca Slicer offers broad printer & filament compatibility, built-in integration tools, smart automation, advanced features, modern UI, and intuitive UX, and much more slicing algorithms.
Feature | OrcaSlicer | PrusaSlicer | Cura | Bambu Studio | Lychee / MatterControl |
|---|---|---|---|---|---|
Printer profiles (non-OEM) | Excellent | Very good | Many | Best for Bambu + basic non-Bambu | Limited |
Calibration tools built-in | Strong (PA, flow, temp towers etc) | Strong but most manual | Few tools but More manual | Few Good but most Hidden | Lesser for FDM; strong in resin sphere for Lychee |
Multi-printer / multi-brand flexibility | High | High (especially clones, Marlin etc) | Very high | Best with Bambu; weaker outside its ecosystem | Mixed |
UI / ease of use (for beginners) | Good; a bit more features visible | More complex initially | Very accessible + many beginners used plugins etc | Very good in Bambu’s ecosystem | Varies; some are more user friendly in resin workflows |
Advanced features / automation (overhangs, seam control etc) | Strong | Very strong manual control | Good, many options + plugins | Good defaults; tight hardware integration | More limited for FDM; strong for resin support editing etc |
Community support / tutorials / plugin ecosystem | Growing rapidly | Good | Huge | Good; especially Bambu user base | Strong in niche areas |
Stability + polish (esp with printer integrations) | Very good, but maybe more frequent updates/new features = occasional bugs | Very stable, mature | Stable; long history | Very polished for Bambu | Depends on hardware & use case |
You can choose Orca Slicer:
Troubleshooting & Optimization Tips
FAQs About Orca Slicer
Conclusion
Orca Slicer is one of the best & most powerful 3D Printing Slicer right now. It’s based on Bambu Studio & PrusaSlicer. It’s completely free to use and support regular updates. With more than 300+ Printers Support, you can definitely give it a try. You can use its advanced features like Granule Control over Infill, G-code Customization, Precise Wall & Seam Control, Calibration Suite & Tools, and so much more.
OrcaSlicer is great if you are a beginner in this 3D Printing World and just are looking for a tool for slicing, it’s all you will ever need. Advanced users can use it as well and use advanced slicing options with Orca Slicer’s Nightly Builds. Start experimenting with your 3D Printing Projects today with Orca Slicer and download its latest version today with our website.